Search This Blog

Thursday, December 22, 2011

roasted beet salad with arugula, butter lettuce and goat cheese


there are many recipes for roasted beet salad with cheese and nuts. the dressing is the key in this recipe. it was to accompany a pork roast and a heavy sweet potato,leek, parsnip au gratin. i wanted it to be slightly sweet. it was a hit...a keeper!


first a note on the greens in any salad: for crisp greens that hold the dressing...wash the greens in ice water ahead of time and spin dry. wrap in a dish towel or paper towels and store in the frig. for a couple of hours

 wrap the beets in foil and roast in a 350 degree oven for 1 hour. when they have cooled, remove the skins. the beets can be roasted ahead of time and refrigerated for a day or 2 if needed.

cut the beets in the desired shape. if the beets were small i would have quartered them


diced beets

dressing ingredients
1/2 good quality olive oil
1/3 cup white balsamic vinegar
1/2 teaspoon honey
1 teaspoon grated orange zest
juice of 1 clementine
1 teaspoon dijon mustard
1/2 teaspoon salt
fresh ground pepper

blend all ingredients. i place them in a jar and shake it. this too can be made ahead of time and refrigerated. be sure that it is at room temperature before using it.

crumble the goat cheese. i estimate about an ounce per salad

assemble the salad by placing the greens on a plate and adding a serving of beets,
spoon the dressing over all the beets and greens
add the crumbles goat cheese


                                                                           enjoy!

Tuesday, December 6, 2011

BLUE CHEESE CAKE

it's that time of year, lots of parties and lots of food. the following recipe is easy. it can be made ahead and refrigerated and it can even be frozen. it serves 20 as an appetizer and even more when it is spread on crackers


finished cheese cake
ingredients at room temperature 
2 tablespoons butter
1 cup crushed cheese crackers
16 ounces cream cheese, softened
8 ounces blue cheese or gorgonzola
3 eggs
1/4 cup flour
1/4 teaspoon salt
1/4 cup picante sauce
1 cup sour cream
1/2 cup chopped green onions
1/2 cup chopped walnuts
1/2 teaspoon cajun seasoning(optional)

preheat oven to 325 degrees.
1. butter an 8 inch spring form pan and sprinkle cracker crumbs on the bottom and sides.
2. blend cheeses, flour, eggs, salt,cajun seasoning, picante sauce and sour cream till nice and creamy
3. fold in onions
4. pour mixture into pan( i pour the mixture slowly over a spatula so that the crumbs on the bottom are not      displaced)
5. sprinkle the top with walnuts

bake for 1 hour. cool and chill overnight

serve at room temperature.


                                                                        enjoy!

Sunday, November 20, 2011

make ahead turkey gravy/gluten free


last year i was visiting my dear friend elsa. it was a couple of weeks before thanksgiving and she was making turkey gravy using turkey wings. after the gravy was made, she put it in the freezer...one less chore before serving up the turkey dinner. thinking this was a very smart idea i did the same when i got home. i just finished making this year's turkey gravy last night and i  measured the ingredients! i made it gluten free but the cornstarch can always be switched if a flour thickening is desired. 

i also included a link for my pumpkin cheesecake
http://the-jill-of-all-trades.blogspot.com/2010/11/pumpkin-cheesecake.html

ingredients for 8 cups of gravy
4 pounds turkey wings
2 cans turkey stock (chicken could be substituted)
4 cups water
1 large onion
celery tops
1 teaspoon thyme
1 teaspoon salt

1 cup water
1/2 cup cornstarch or 1 cup flour


preheat oven to 450degrees

turkey wings, onion, celery tops and turkey broth

             place wings in a shallow baking pan in the 450 degree oven for 30 minutes or until brown


 remove wings to a stock pot and deglaze pan with a cup of the water. add the rest of the 4 cups of water, the 2 -14.5 ounces of turkey broth, chopped onion, celery tops and seasoning and simmer covered for 2 hours.
                                          drain  and strain the cooked broth into a saucepan.
the cooked turkey can be picked from the bones and used for another purpose

TO THICKEN THE GRAVY
 mix cornstarch with remaining 1 cup of water making sure there are no lumps. add this mixture to the  broth in the saucepan and turn on the heat. stir constantly until the gravy reaches a rolling boil. if the gravy is not thick enough, mix more cornstarch and water...remove from heat and add slowly ,stirring constantly till it is the right consistancy for you. if it is too thick, some broth can be added from the turkey when it is reheated on thansgiving.  the gravy is now ready to refrigerate or freeze


                            ready to enjoy! 

Friday, October 28, 2011

leek, chard and turkey soup

i had not been out to the garden for about two weeks. rainy weather and other things to do i guess. i was pleasantly surprised when i went out this past monday. the late plantings of lettuce, arugula, tatsoi and cilantro were flourishing in the damp, cool weather. the chard that i planted in the beginning of june was still beautiful with its yellow, orange and red spines. the parsley was abundant.

i had about 3 quarts of turkey stock from cooking down a meaty turkey carcass. my neighbor and friend betsy gave me three huge leeks from here garden...what to make?  how about some turkey, leek, chard soup!

soup is easy to make. no measurements needed. most important is the stock. 'you have to put good in to get it out'. the bones for stock must be meaty. watery, weak stock just does not yield good soup


                                              3 large leeks that have been cleaned and sliced.


                                            a very large bunch of chard that has been chopped.

place the leeks and chard in with the stock pot with the broth and the turkey. i always chop the meat that has been cooked for the broth. it is a great way to find any little bones that you might have missed when the carcass was picked.bring to a simmer and add 3 sliced carrots...always great for color.

after about 20 minutes, bring the soup to a rolling boil and add some noodles or rice and a cup or so of chopped parsley. i added a cup and a half of small egg bows. i let them boil about 5 minutes stirring frequently and then turned off the heat.

the soup was an experiment and it was very tasty. it was interesting to see the colored stems of the chard change the color of the stock to a light yellow.
                                  enjoy!

Sunday, October 16, 2011

oatmeal cookies with 'lots of goodies'

i rarely blog about baking because it is not my favorite... too restricting! i always feel like i am back in chemistry lab. i do know that if you follow the chemistry of baking that you can add all kinds of extras as long as you measure all the important stuff. i am not a chocolate chip cookie fan, especially the soft ones. i like my cookies to be either chewy or crunchy. this is my #1 choice. the nice thing about it is if you do not like one of the extras or goodies as i call them, you can always double up on the ones you like.

oatmeal cookies with raisins, chocolate chips, walnuts and coconut

1/2 pound softened butter
1 cup dark brown sugar
1 cup sugar
3 tablespoons milk
2ggs
2 teaspoons vanilla extract

dry ingredients
1 cup whole wheat flour
1 cup pastry flour
1 teaspoon each of salt, baking powder and baking soda

the goodies
2 cups oats
1 cup raisins
1 heaping cup chocolate chips
1 cup chopped walnuts or pecans
1 cup coconut

cream the butter and sugars until light and fluffy. add the eggs,milk and vanilla

sift the dry ingredients and stir into the sugar and butter mixture.

fold in the oats and other 'stuff'.

preheat oven to 350 degrees

i use 2 soup spoons for shaping these cookies. try to shape them into balls as you put them on the cookie sheet and make sure they are at least 2 1/2 inches apart...they spread. they are about 3 inches across after they are baked. the recipe makes 3 times the amount in the picture (family got the rest).

bake for 8-15 minutes depending on the size and your oven. watch the first batch carefully and do not over bake. when they are light brown on the edges, remove from the oven and allow to cool for a few minutes before placing on the cooling rack,newspaper or whatever you use to cool your cookies. they will harden when they are cool.

enjoy!

Sunday, October 2, 2011

dilled green potatoes


this recipe is most certainly tried and true. 48+ years ago my hubby and i finished school, got married 2 weeks later and a month after that he was in the air force and we landed in Duluth, Minnesota for 2 wonderful years. i was a very inexperienced cook and this is one of the first recipes that one of the other wives shared. it is a great side dish for grilled or roasted meats. the best part is that it can be made a day ahead and refrigerated


idaho potatoes, fresh chives, frozen chopped spinach, Jerusalem artichoke flowers
ingredients 6 large potatoes, peeled and cooked
3/4 -1 cup of light cream
1/4 pound butter, softened
1 teaspoon sugar
2 teaspoons salt
1/4 teaspoon pepper
4 tablespoons chopped chives
1 1/2 teaspoon dried dill weed
1 package thawed and drained chopped spinach ( i squeeze it)

thawed and drained spinach and chopped chives
mash the potatoes with the butter and cream until they are fluffy.  add the rest of the ingredients and mix.
 place the mixture in a greased casserole( 1 1/2 quart )and either refrigerate or place in the oven at 400 degrees for 20 minutes.
                                                                   serve and ENJOY!

note: i have made this recipe without the dill when i did not think it went with the rest of the meal...it was still good!

Sunday, September 18, 2011

september/salsa season

  
 it is hard to believe now but when i first made this recipe, there was no salsa in the grocery stores. no taco products. not even tortillas. now that was 40+ years ago. my husband had just gotten out of the air force and we were stationed with some friends from Texas. they introduced us to the wonder of 'tacos'...all made from scratch!

this recipe makes 12-15 pints and it takes about 4-5 hours but it is worth the effort and it lasts most of the winter IF one can keep the grands out of it.

recipe ( no measurements critical)
15 cups peeled, chopped tomatoes
1 1/2 heads of garlic, peeled and minced
6 cups of onions
6 cups red peppers, cleaned, chopped and drained
8 jalapeno peppers with seeds removed, chopped fine
1 cup white vinegar
1 cup chopped fresh cilantro
1 1/2 tablespoons chili powder
2 tablespoons ground cumin
2 tablespoons salt
1 teaspoon pepper
2 small cans tomato paste

peel the tomatoes in batches. cover with boiling water for 2 minutes. lift out and place in cold water for the same amount of time. core, peel and cut is small chunks.
 i use the food processor to chop everything but the tomatoes. garlic first while machine is running. onion next on pulse.i also chop the cilantro with the last batch of onions. add all ingredients EXCEPT peppers and tomato paste. bring to a boil and simmer for 1-1 1/2 hours.

 meanwhile chop and drain the peppers and open the cans of paste.

my mess
while the  tomatoes, etc. are simmering...stir occaionally and                                                                       run jars through the dishwasher
have lids ready to boil.
when the consistency is to your liking, turn the lids on high
add the peppers and tomato paste and bring to a rolling boil.
fill hot jars, a few at a time leaving 1/2 inch from top
clean edge of jar and place hot lid and secure with the ring...and wait for the ping!


salsa
i always keep the jars on the counter for a week or two to make sure that the lids remain indented before they make the trip to the pantry.

                                                                             ENJOY!

a glimpse of the pantry

pear chutney

club sauce


salsa

pickles, relish and apple butter

canning tomatoes


even though canned tomatoes are easily attained, i still like to can a few of my own. they are sweeter, and have no cores. i like to use them in stews and other winter dishes. i will also use them if i run out of the marinara sauce that is packed away in the freezer.
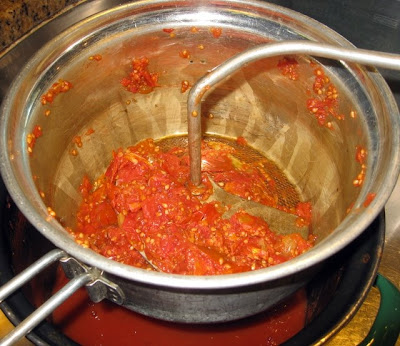
 my canner holds 7 quart jars. i never hot pack tomatoes as my mother did. i fill the clean jars and then process them in the canner. i have never had a jar go bad canning this way . first, they have to be peeled. i place about half of the tomatoes in the small side of my sink but a container can be used. i then pour boiling water over them and let them sit a minute or two.  remove them with a slotted spoon into very cold water. remove the core with a paring knife and remove the skin...it practically flies off! i have cut and x at the bottom of the tomatoes but find it a waste of time. it is important not to let the tomatoes stay in the hot water too long as they will cook and get mushy. keep the tea kettle filled and on low and do smaller batches.
quarter the peeled tomatoes and fill the jars. i never add water or juice to fill the jars. i just force the tomatoes down and they make their own juice. more tomatoes to the jar this way.

 i always put any canning jars through the dish washer and through the heated drying cycle.

it is important to remove the air by taking a knife and going completely around the jar. note the space at the top of the jar.

 make sure that the edge of the jars are perfectly clean. ADD 1 TEASPOON SALT and place lids and secure gently. submerge jars into canner making sure that the water covers the tops of the jars. turn on the heat and bring the water to a boil. boil for 35 minutes.
lift jars from the hot water bath. dab hot water off the top of the lids and tighten
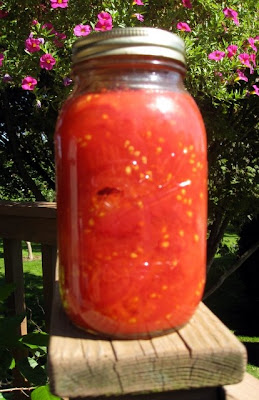
                                    a quart jar of canned plum tomatoes ready for the pantry
                                                                    ready to ENJOY!

club sauce
recipe in blog september 2010

Friday, September 2, 2011

tomato soup for now and later

right now, my 25 tomato plants are yielding pounds and pounds of wonderful tomatoes. i am supplying family and friends and still have more than we can eat. i do can and freeze tomato recipes. last year i blogged fresh marinara saucehttp://the-jill-of-all-trades.blogspot.com/2010_08_01_archive.html, oven dried tomatoeshttp://the-jill-of-all-trades.blogspot.com/2010/08/oven-dried-tomatoes.html and club saucehttp://the-jill-of-all-trades.blogspot.com/2010/08/club-sauce.html. my friend betsy , an artist ,gardener, and good cook , suggested i try her tomato soup. now, i have never been a lover of tomato soup but this recipe has changed my mind. it makes plenty to eat now and freeze for winter. the great thing is that cream, milk or soy milk is added when the soup is heated. betsy also has a blog about her unique and delightful jewelry http://eaststreetpins.blogspot.com/

my version of betsy's tomato soup
ingredients
8 quarts tomatoes

4 large onions
1 bunch celery, yep, the whole thing
1 jalapeno pepper, my addition, seeds too if you want a bite
1 large bunch of parsley

1/3 cup sugar
1 tablespoon salt or to taste
pepper

12 ounces butter
1 cup flour

cream, milk or soy when heated

cut up the tomatoes and bring to a boil. simmer till most of the juice is gone. it will take a couple of hours.
meanwhile, wash and cut up the veggies and place in a separate container.


skim enough of the tomato juice off the pot of tomatoes to cover the vegetables and bring to a boil and simmer for an hour.(i put the juice through a strainer to remove any seeds)


puree the vegetables either in a blender, processor or food mill. i used a blending tool for the vegetables and a foley mill for the tomatoes in order to remove the skins and seeds


in another container, melt the butter and add the flour( a roux) stir and lightly brown the roux.
in a large pot, combine the tomatoes, pureed vegetables, roux, sugar and seasonings. boil for 5 minutes. taste and adjust seasonings.

to 2 cups of soup, i added 1 cup of fat free half and half. if i was using milk, it would be closer to equal amounts of each. no portions in the recipe are critical!

the recipe made about 8 pints of the tomato base. most of it made it into the freezer but not all...
                                                                            enjoy!
Sunday, August 21, 2011

two easy and delish summer salads-corn and tomato


two very easy salads that take minutes to make. the corn salad is one of the ways that i use the leftovers from 'corn on the cob'. the tomato salad is simple and more ingredients can be added but this version is quick and so good. the picture below is neither tomato nor corn but begged to be included...


cosmos, a future painting

i am still waiting for the large heirlooms to ripen. in the meantime, the 2 'glacier ' plants are producing an abundant supply of small, very sweet fruit. the cherry , black cherry and yellow pears are ripening fast also. for this salad, i chose the glacier and yellow pears. any combination of any variety will do


tomato salad
3-4 cups tomatoes cut into bite size
1 or 2 cloves of garlic sliced...or not
6 large basil leaves, sliced or slivered, i use scissors
3-4 tablespoon's good quality olive oil
1 tablespoon  white balsamic vinegar
salt and fresh ground pepper to taste

stir all the ingredients and set aside at room temperature. do not refrigerate. matter of fact, never refrigerate tomatoes unless they are cooked or dried.

i always try to make this an hour or 2 ahead to let the flavors blend. and i stir while i am preparing the rest of the meal. good bread is essential to dip in the juice!!

it is the height of the corn season in central new york. no more tiny ears with tiny kernels. we are into the meaty ears and it is so sweet this year. we always buy more than we eat and then cut the kernals off the uneaten ears for later use. i use it in soup most of the time but love the corn salad i have been making this year.

cooking corn: steam it or grill it! where i grew up, everyone steams corn. an inch of water in the bottom of the pan and 10 minutes after it comes to a boil it is done. i have seem cooks boiling corn. a real waste of time and energy, really, and it takes so long for all that water to boil. if it can be grilled, it is even better than steamed .

corn salad
3 cups cold corn, cooked and cut off the cob
2 cucumbers, peeled and cut in bite size pieces
1 sweet onion or 1 bunch of green onions chopped
3 tablesoons apple cider vinegar
3 tablespoons olive oil
8  basil leaves,sliced, slivered or torn
salt and pepper to taste

stir and refrigerate till it is time to serve it...it will be a hit!


ENJOY!