Search This Blog

Showing posts with label CANNING. Show all posts

Sunday, September 18, 2011

september/salsa season

  
 it is hard to believe now but when i first made this recipe, there was no salsa in the grocery stores. no taco products. not even tortillas. now that was 40+ years ago. my husband had just gotten out of the air force and we were stationed with some friends from Texas. they introduced us to the wonder of 'tacos'...all made from scratch!

this recipe makes 12-15 pints and it takes about 4-5 hours but it is worth the effort and it lasts most of the winter IF one can keep the grands out of it.

recipe ( no measurements critical)
15 cups peeled, chopped tomatoes
1 1/2 heads of garlic, peeled and minced
6 cups of onions
6 cups red peppers, cleaned, chopped and drained
8 jalapeno peppers with seeds removed, chopped fine
1 cup white vinegar
1 cup chopped fresh cilantro
1 1/2 tablespoons chili powder
2 tablespoons ground cumin
2 tablespoons salt
1 teaspoon pepper
2 small cans tomato paste

peel the tomatoes in batches. cover with boiling water for 2 minutes. lift out and place in cold water for the same amount of time. core, peel and cut is small chunks.
 i use the food processor to chop everything but the tomatoes. garlic first while machine is running. onion next on pulse.i also chop the cilantro with the last batch of onions. add all ingredients EXCEPT peppers and tomato paste. bring to a boil and simmer for 1-1 1/2 hours.

 meanwhile chop and drain the peppers and open the cans of paste.

my mess
while the  tomatoes, etc. are simmering...stir occaionally and                                                                       run jars through the dishwasher
have lids ready to boil.
when the consistency is to your liking, turn the lids on high
add the peppers and tomato paste and bring to a rolling boil.
fill hot jars, a few at a time leaving 1/2 inch from top
clean edge of jar and place hot lid and secure with the ring...and wait for the ping!


salsa
i always keep the jars on the counter for a week or two to make sure that the lids remain indented before they make the trip to the pantry.

                                                                             ENJOY!

a glimpse of the pantry

pear chutney

club sauce


salsa

pickles, relish and apple butter

canning tomatoes


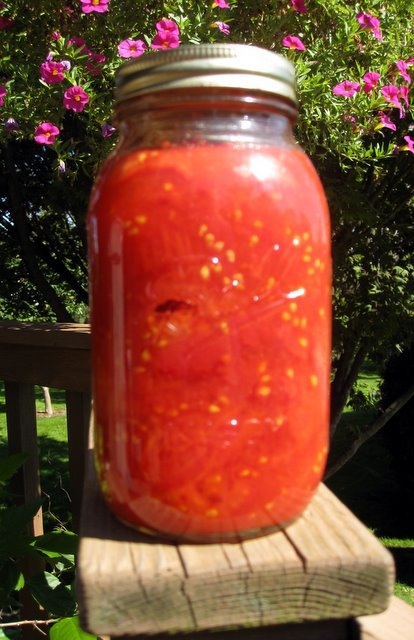
even though canned tomatoes are easily attained, i still like to can a few of my own. they are sweeter, and have no cores. i like to use them in stews and other winter dishes. i will also use them if i run out of the marinara sauce that is packed away in the freezer.
 my canner holds 7 quart jars. i never hot pack tomatoes as my mother did. i fill the clean jars and then process them in the canner. i have never had a jar go bad canning this way . first, they have to be peeled. i place about half of the tomatoes in the small side of my sink but a container can be used. i then pour boiling water over them and let them sit a minute or two.  remove them with a slotted spoon into very cold water. remove the core with a paring knife and remove the skin...it practically flies off! i have cut and x at the bottom of the tomatoes but find it a waste of time. it is important not to let the tomatoes stay in the hot water too long as they will cook and get mushy. keep the tea kettle filled and on low and do smaller batches.
quarter the peeled tomatoes and fill the jars. i never add water or juice to fill the jars. i just force the tomatoes down and they make their own juice. more tomatoes to the jar this way.

 i always put any canning jars through the dish washer and through the heated drying cycle.

it is important to remove the air by taking a knife and going completely around the jar. note the space at the top of the jar.

 make sure that the edge of the jars are perfectly clean. ADD 1 TEASPOON SALT and place lids and secure gently. submerge jars into canner making sure that the water covers the tops of the jars. turn on the heat and bring the water to a boil. boil for 35 minutes.
lift jars from the hot water bath. dab hot water off the top of the lids and tighten
                                    a quart jar of canned plum tomatoes ready for the pantry
                                                                    ready to ENJOY!

club sauce
recipe in blog september 2010

Saturday, August 21, 2010

club sauce

this is a tomato recipe, the first of many...but no more tomato pictures. enough already! i got this recipe from my next door neighbor jean who will celebrate her 90th birthday this september. she gave me the recipe the year i planted my first garden and put in 4 dozen tomato plants.

this recipe is a keeper. i tried many other chili sauces with spices over the years but this one wins out. the only changes i have made is to only use red peppers and i like a bite so i add either a hot pepper or some red pepper flakes
this year the color is a little different because i used cherokee and black krim heirloom tomatoes

club sauce-the ingredients
8 large tomatoes
2 large onions, chopped
3 cups sugar
2 cups white vinegar
2 tablespoons salt
4 large red peppers
1 small hot pepper(optional)

the process
peel and chop tomatoes
.if you have never done this just bring a kettle of water to boil and pour over tomatoes and let them sit for a minute. take a tomato and run under cold water and peeling them is a snap!
chop onion and add all ingredients except peppers
bring to a boil stirring constantly so sugar does not burn bottom of the pan ( i just did that and had to change pans)
simmer, stirring every few minutes for approximately 1 1/2 hours or until thick


meanwhile,grind peppers and let them drain in a colander while the tomatoes cook


a good time to prepare your jars and lids for canning the club sauce

since you are stuck in the kitchen , you might as well bake something. i made a couple of pies

again, canning is a timing issue with jars clean and hot, lids hot and ready when the cooking is finished
when the sauce is thick enough, stir in the peppers and bring to a boil.
do not let the peppers boil for any time. as soon as the mixture comes to a boil after the addtion of the peppers, turn off the stove.

ladle the club sauce into hot ,clean jars, clean the rim, and place hot lids and rings and wait for the ping. if by chance a jar does not seal, refrigerate and use.
this is 1 1/2 recipe. it made roughly 10 pints
enjoy

Saturday, August 7, 2010

chunky garlic dills

it has been a great growing season for cucumbers but they are near the end. i am making the last batch of sweet relish and the shredded ingredients are in the salt and ice water. they need to soak in the salt for a couple of hours. so, i have a little time on my hands and besides, i need to 'sit a spell'.

earlier this week,  i did a recipe of chunky garlic dills with the large cucumbers.  they have been on the counter in the crock for 6 days. i removed them from the crock and have divided them between 2 recycled plastic jars. i will put the lids on the jars and refrigerate these until they are eaten. they will keep a long time.


chunky garlic dills

this recipe can be as varied as you like. if a strong garlic flavor with a bite is not what you want, better cut back on those ingredients.

4 pounds of cucs, washed and cut in 1 inch chunks
6 cloves of garlic, chopped
8 large heads of dill, more if small
2 jalapeno peppers,sliced  (they are abundant in the garden) or 1tablespoon pepper flakes

place in a crock and cover with the brine

2 quarts boiling water
2 cups cider vinegar
1/3 heaping cup of canning or kosher salt
1/3 heaping cup of sugar
1/4 cup mixed pickling spice
1 tablespoon peppercorns
1 tablespoon mustard seed

fill a gallon zip lock bag with water and seal. place over the ingredients. this will keep the cucumbers submerged in the brine. check daily after 3 days to see if any scum is forming as the pickles work. remove any of the white scum and replace plastic bag. i kept this batch in the crock for 6 days and the pickles were cured. refrigerate and enjoy!

don't you just love phlox

Saturday, July 31, 2010

sweet pickle relish

the cucumbers are about done and they were forgotten for a few days and are quite large. i would now insert a photo of the too large cucs but my husband went scuba diving in the St Lawrence and took my camera.

sweet pickle relish (makes 7-8 pints)

8 cups grated cucumbers, skin on, large seeds removed
2 large onions, grated
3 green peppers, seeds removed and grated
1 red pepper, seeds removed and grated
2 jalapeno peppers, seeds removed and grated
1/2 cup kosher or pickling salt

syrup
6 cups sugar
4 cups apple cider vinegar
2 tablespoons celery seed
1 1/2 tablespoons mustard seed

place cucumbers, onions, peppers in a container ( i use an enameled dutch oven)
top with salt, ice and water and let soak for 2 -4 hours
drain in a colander

                                                           jaques and the camera are back
                                      bring syrup ingredients to a boil and add drained relish mix
bring to a boil and simmer for 30 minutes

while the mixture is simmering, time it so that the clean jars are either in a boiling water bath or the just finishing the drying cycle in the dishwasher.
the lids and caps are also boiling for at least 20 minutes

fill the hot, clean jars with the relish leaving 1/2 inch at the top. run a damp paper towel around the rim
top with a hot lid and twist on the ring

and wait for the ping!


Sunday, July 25, 2010

bread and butter

the cucumbers are still coming on strong. we have had plenty of rain and very warm weather for central NY. there are enough cucs for a batch of bread and butter pickles. I started out with gramma gearhart's recipe but it has changed quite a bit over the last 45 years. one of the items that i eliminated was green peppers.

jill's bread and butter pickles:

note: the size of this recipe can be reduced

8 quarts sliced cucumbers
5 sliced large onions
3/4 canning or kosher salt

for syrup:
5 pound bag of sugar (roughly 10 cups)
6 cups of apple cider vinegar
1 tablespoon celery seed
4 tablespoons mustard seed
1 tablespoon turmeric
1 tablespoon red pepper flakes(can be omitted if you can't take the heat:)

2 cloves of garlic for each quart jar

procedure:
slice 8 quarts of cucumbers about 1/4 inch thick. place in a pot, bowl or whatever you have that will hold them all.  add a heaping 1/2 cup of kosher or canning salt and cover with ice and water


let stand for at least 3 hours. during that time slice 5 large onions. i cut the onions in half and then slice them a little smaller than the cucs. peel 1 clove of garlic for each pint jar and 2 cloves of garlic for each quart jar. set aside till it is time to fill the jars.

it is a great time to get out your canning jars (enough to hold 8 quarts in whatever combination you choose) make sure that the jars are spotlessly clean and that there are no chips on the rim at the top(critical for sealing the jars) you will need a jar ring and new lid for each jar...

the canning process for these pickles is called 'hot pack'. 2 things are essential in successful canning. everything must be very clean and very hot!  i put my clean jars in the dishwasher and run it through a full cycle, timing it so that they are in the drying cycle when it is time to fill the jars. the lids and rings go into my steamer and i boil them for 20 minutes. the water is boiling as i use them.

okay: time to make the pickles.

the jars are in the rinse cycle of the dishwasher, the lids are rattling away in the boiling water on top of the stove.

drain the cucumbers

place all the syrup ingredients in a 12 gallon pot. stir till it comes to a boil.

add the onions, bring to a boil

add the drained cucumbers, continue stirring till it reaches a simmer and the cucumbers have turned from green to yellow-green

take out 1/2 of the jars and plop in garlic

fill jars 3/4 with pickles and top with syrup, leaving 1/2 inch at top

run clean damp paper towel around top of jar to make sure no seeds are there

take out hot lid and ring and secure lid on jar (twist)

continue procedure till all pickles and syrup are gone

now you can not mess with these jars till you have heard the magic 'ping' which means that the jars have sealed. when the jars have cooled, you can check to make sure that they are sealed by pressing on the center of the lid. there will be no play on sealed jars

if by some missed seed, chip in the rim, etc that one of the jars has not sealed...just place it in the frig and eat them in a couple of weeks

if you have leftover syrup: combine it with mayo,shredded cabbage and make coleslaw.

ENJOY! 

Wednesday, July 21, 2010

cucumbers, random thoughts and open crock dills


DILL PICKLES

for the first time in three years, the cumbers are good and abundant. i started the plants in the back garden from seed in May and direct sowed the crop growing up the fence the last week in May. the first picking was shared with the extended family. the second time there were plenty to do a batch of open crock dill pickles. they turned out great

INGREDIENTS FOR OPEN CROCK DILL PICKLES

20-30 dill size cucumbers,washed

3/4 cup kosher salt

1 gallon or so water (it has to cover the cucs)

1 cup apple cider vinegar

1 heaping tablespoon pickling spice

4 cloves of garlic, smashed

4-6 green seeded heads of dill plus most of one plant(thats the weed part)


NEXT

bring the water to a boil, throw in the salt and dissolve it, add vinegar

alternate placing the cucumbers and dill in a crock, gallon jug or whatever you have that will work

toss in the pickling spice and the garlic and pour the hot brine over the whole deal

take a zip lock plastic gallon bag and fill it with water. seal it and place over cucumbers ao that all ingredients are submerged (much better than the plate and a rock from my younger days)

keep crock in a cool place (i have had better luck since we got central air)


after 3 or 4 days check for scum and skim it off daily, as needed. these took 8 days to become a really good dill pickle
the crock was a gift from a friend many years ago. it was hand crafted by the wettlaufers


after the 8 days or when the pickles are cured enough, put them into whatever containers you wish. i use old plastic jars that i have saved. dilute the brine by a third and cover and refrigerate.

RANDOM THOUGHTS AND PICTURES


the front border...an old triple daylily and volunteer black eyed susans


close up of tomatoes. i think this is the heirloom 'cherokee'. i started the tomatoes from seed in April. in our growing zone,i put them in the ground June 1st. It gives the soil time to warm up and keep their little feet warm.


The pink, white and lavender cleome are all volunteers. I first saw them at the Philadelphia Flower Show about 25 years ago. i came home and ordered the seed and have not bought any since then


red

a closer shot of the red runner beans on top and the corner of the fence with geraniums, a black cherry tomato in a pot (in case the deer get the rest) a fading clematis and a morning glory vine, miniature white roses and million bells/